ClickFunnels Tracking Not Working? Google Ads/GA4 Fixes
![]()
ClickFunnels is a powerful tool for building high-converting sales funnels, but integrating robust tracking for platforms like Google Ads and Google Analytics 4 (GA4) can sometimes be a frustrating experience. Common pitfalls, especially with 2-step checkouts and thank-you page script placements, can lead to significant data discrepancies, leaving you blind to your true ad performance and lost sales. If your ClickFunnels tracking isn't working as expected, this guide will help you diagnose and fix the most common issues.
Why ClickFunnels Tracking Can Be Tricky
Unlike traditional e-commerce platforms that offer deep integrations and standardized data layers, ClickFunnels operates as a sequence of distinct pages within a funnel. This design, while excellent for conversions, can present challenges for tracking scripts:
- Lack of a Standard DataLayer: ClickFunnels doesn't natively expose dynamic data (like product IDs, prices, or transaction IDs) through a consistent
dataLayerobject that Google Tag Manager (GTM) can easily read for e-commerce tracking. - Page Transitions: During multi-step processes (like 2-step checkouts), data or scripts might not persist correctly from one step to the next.
- Thank-You Page Reliance: Conversion tracking heavily relies on scripts firing correctly on the final thank-you or order confirmation page, which can be tricky to configure precisely.
Step 1: The Foundation - Google Tag Manager (GTM)
The absolute best practice for managing all your tracking on ClickFunnels (and any website) is to use Google Tag Manager (GTM). It provides a central place to manage all your tags without directly editing ClickFunnels page code repeatedly.
-
Create a GTM Account: If you don't have one, create a free GTM account at tagmanager.google.com.
-
Install GTM on ClickFunnels:
- In your GTM container, locate your GTM Container ID (e.g.,
GTM-XXXXXXX). - In your ClickFunnels account, navigate to the specific Funnel where you want to add GTM.
- Go to "Settings" (for the entire funnel) or "Page Settings" (for an individual page).
- Find the "Head Tracking Code" section.
- Paste the entire GTM "Head" snippet (the one starting with
<script>) into this section. - (Optional but Recommended) If ClickFunnels provides a "Body Tracking Code" section, paste the GTM "Body" snippet (the one starting with
<noscript>) there. If not, just the Head snippet is usually sufficient for most tracking. - Save and update your funnel/page settings.
- In your GTM container, locate your GTM Container ID (e.g.,
-
Verify GTM Installation: Use Google Tag Assistant (a Chrome extension) or GTM's "Preview" mode to ensure your GTM container is firing correctly on all pages of your funnel.
Step 2: Fixing Google Ads Conversion Tracking
Google Ads conversions are critical for optimizing your campaigns. The key is to ensure the conversion tag fires precisely when a sale or lead occurs.
-
Global Site Tag (Google Tag):
- In Google Ads, navigate to "Tools and Settings" > "Measurement" > "Conversions."
- Select your conversion action and go to "Tag setup." Choose "Install the tag yourself."
- Copy the "Google tag" (formerly Global Site Tag) snippet. This is the base code (
gtag.js) that should load on *every page* of your funnel. - Placement: In GTM, create a "Custom HTML" tag. Paste the Google tag snippet here. Set the trigger to "All Pages." This ensures the foundational tracking code is present throughout your funnel.
-
Conversion Event Snippet (The "Thank You" Page Fix):
- From the same Google Ads "Tag setup" section, copy the "Event snippet" for your conversion (e.g., "Purchase"). This is the specific piece of code that tells Google Ads a conversion has happened.
- Critical Placement for ClickFunnels: In GTM, create a new "Google Ads Conversion Tracking" tag.
- Paste your Google Ads Conversion ID and Conversion Label.
- Trigger: Set this tag to fire ONLY on your final "Thank You" or "Order Confirmation" page.
- Go to this specific page in your ClickFunnels editor.
- Note down the unique part of its URL (e.g.,
/order-confirmationor/thank-you). - In GTM, create a new "Page View" trigger. Set it to "Some Page Views" and configure it to fire when "Page Path contains" your unique thank-you page URL segment.
-
Dynamic Values (Transaction ID & Value) - The DataLayer Challenge:
ClickFunnels doesn't easily provide transaction IDs or values for GTM to grab. Here are approaches:
- Enhanced Conversions: Configure Enhanced Conversions in Google Ads. This allows you to send hashed first-party data (like email, phone) from your thank-you page to Google, improving conversion accuracy without needing a dynamic transaction ID in the traditional way. You might still need custom JavaScript to push these hashed values to the dataLayer.
- Custom JavaScript (Advanced): If you know JavaScript and the data is present on the page (e.g., in hidden fields, span tags), you might be able to write custom JavaScript to extract the order ID and value and push them to GTM's dataLayer. This requires technical expertise.
- Third-Party Integrations: Consider using third-party tools designed to bridge the gap between ClickFunnels and ad platforms (e.g., Zapier, AnyTrack, Elevar) which can help send server-side data for more accurate tracking, including transaction IDs and values.
-
Testing Google Ads Conversions:
- Use GTM Preview mode to simulate a conversion.
- In Google Ads, go to "Tools and Settings" > "Measurement" > "Conversions." Click on your conversion action. When you make a test conversion, you should see its "Status" change to "Recording conversions."
- Check your Google Ads campaign data after a few hours to see if conversions are populating.
Step 3: Configuring Google Analytics 4 (GA4) Tracking
GA4 is event-based, making it flexible but also requiring careful setup, especially for e-commerce data.
-
GA4 Configuration Tag:
- In GTM, create a new "Google Analytics: GA4 Configuration" tag.
- Enter your GA4 Measurement ID (e.g.,
G-XXXXXXX). - Set the trigger to "All Pages." This ensures GA4 starts tracking page views across your entire funnel.
-
GA4 Purchase Event (The 2-Step Checkout/Thank You Page Fix):
- For purchases, you need a specific GA4 "event" tag. In GTM, create a "Google Analytics: GA4 Event" tag.
- Set the "Event Name" to
purchase. - Trigger: Similar to Google Ads, this must fire ONLY on your final Thank You/Order Confirmation page. Use a "Page View" trigger that activates when "Page Path contains" your unique thank-you page URL segment.
- Event Parameters (E-commerce Data): This is where it gets complex due to ClickFunnels' dataLayer limitations.
- Ideally, you'd send e-commerce parameters like
transaction_id,value,currency, anditems(an array of product details). - Without a DataLayer: You might need to manually input static values for testing, or use custom JavaScript to scrape values from the page and push them to the dataLayer *before* the GA4 purchase event fires. This is often the trickiest part and may require developer assistance or third-party tools to capture dynamic order data reliably.
- If precise e-commerce reporting is critical, consider platforms that provide better dataLayer support or invest in advanced server-side tracking solutions.
- Ideally, you'd send e-commerce parameters like
-
Other GA4 Events (Optional but Recommended):
- Consider setting up other standard e-commerce events (
add_to_cart,begin_checkout) on their respective funnel steps. - For these, you'll need triggers based on button clicks or specific page views within your funnel. Again, dynamic product data will be a challenge without a robust dataLayer.
- Consider setting up other standard e-commerce events (
-
Testing GA4 Events:
- Use GTM Preview mode to fire events.
- Go to Google Analytics 4 > "Admin" > "DebugView." As you click through your funnel and trigger events, you should see them populate in DebugView in real-time. Look for the
purchaseevent and check its parameters for accuracy. This is similar to how you would debug if your WooCommerce sales aren't tracking.
Troubleshooting Common Issues
- Scripts Not Firing on 2-Step Checkout:
- Ensure your Google Tag (
gtag.js) is on *all* funnel steps, not just the first or last. - For conversion events, confirm the trigger is set to fire on the *final* confirmation step.
- If the checkout process involves a redirect, verify that your tracking scripts persist across the redirect. Some redirects might strip URL parameters or prevent scripts from executing. This is a common cause for UTM tags not working as well.
- Ensure your Google Tag (
- "No Events Received" in Facebook Ads Manager (Conversions API): While this article focuses on Google, it's a related issue. If you're using Facebook Conversions API (CAPI) with ClickFunnels, ensure your server-side setup is correctly configured to send purchase events and that the
event_idfor server and browser events matches for deduplication. This is a common challenge we've addressed in our guide, How to Fix 'No Events Received' in Facebook Events Manager. - Missing Dynamic Values: If your ad platforms aren't receiving revenue or transaction IDs, the primary culprit is often the lack of a dataLayer. Explore custom JavaScript solutions if you have the technical skills, or consider third-party tools that simplify data extraction and server-side sending for ClickFunnels.
- Check for Conflicting Scripts: Ensure you haven't installed multiple versions of the same script (e.g., both a hardcoded GA4 script and a GTM-deployed one). This can lead to inflated or inaccurate data.
Accurate ad tracking in ClickFunnels requires a meticulous approach, especially given its unique architecture. By leveraging Google Tag Manager and carefully configuring your tags to fire on the correct funnel steps, particularly the crucial thank-you page, you can significantly improve the reliability of your Google Ads and GA4 data. If you continue to face challenges or need expert assistance with complex tracking setups, don't hesitate to contact WebCareSG for specialized digital marketing and analytics support.
Related WebCare Solutions

When Should You Hire a Website Repair Expert?
Learn the key signs indicating it's time to bring in professional website repair experts to resolve complex or persistent issues.
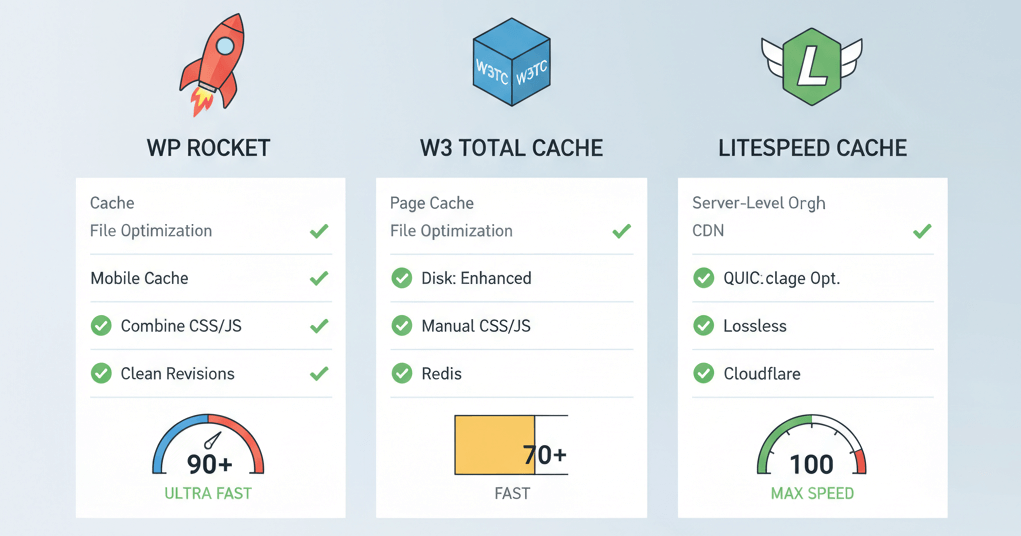
Configure WordPress Caching: Optimal Settings for Speed and SEO
A practical guide comparing popular WordPress caching plugins and providing optimal settings for page, object, and browser caching to drastically improve website speed and user experience.
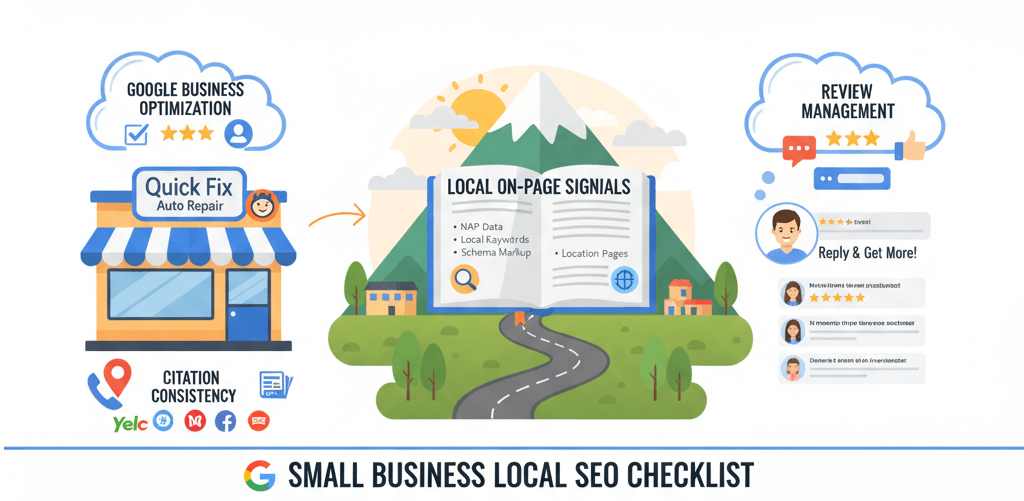
Local SEO Checklist for Small Businesses (Google Business Profile)
An actionable checklist for small businesses to improve their local SEO by optimizing their Google Business Profile, managing online reviews, and ensuring citation consistency.
Ready to get started?
Focus on your business while we fix your website. Contact WebCareSG today for fast, reliable solutions!
Whatsapp us on