Staging Environments Demystified: Test Changes Without Breaking Your Live Site
If you run a business website in Singapore and have ever made a change that accidentally broke your live site, you know how stressful that can be. Every hour your website is down means lost customers, missed inquiries, and potential damage to your brand reputation. This is exactly why staging environments exist — and why every Singapore business owner with a website should understand how to use them.
A staging environment is essentially a duplicate of your live website where you can test changes safely, without affecting what your actual customers see. Think of it as a practice ground where you can make all the mistakes you need to, before performing on the main stage. In this guide, I will walk you through exactly what staging environments are, why they matter for your Singapore business, and how you can set one up step by step.
What Exactly Is a Staging Environment?
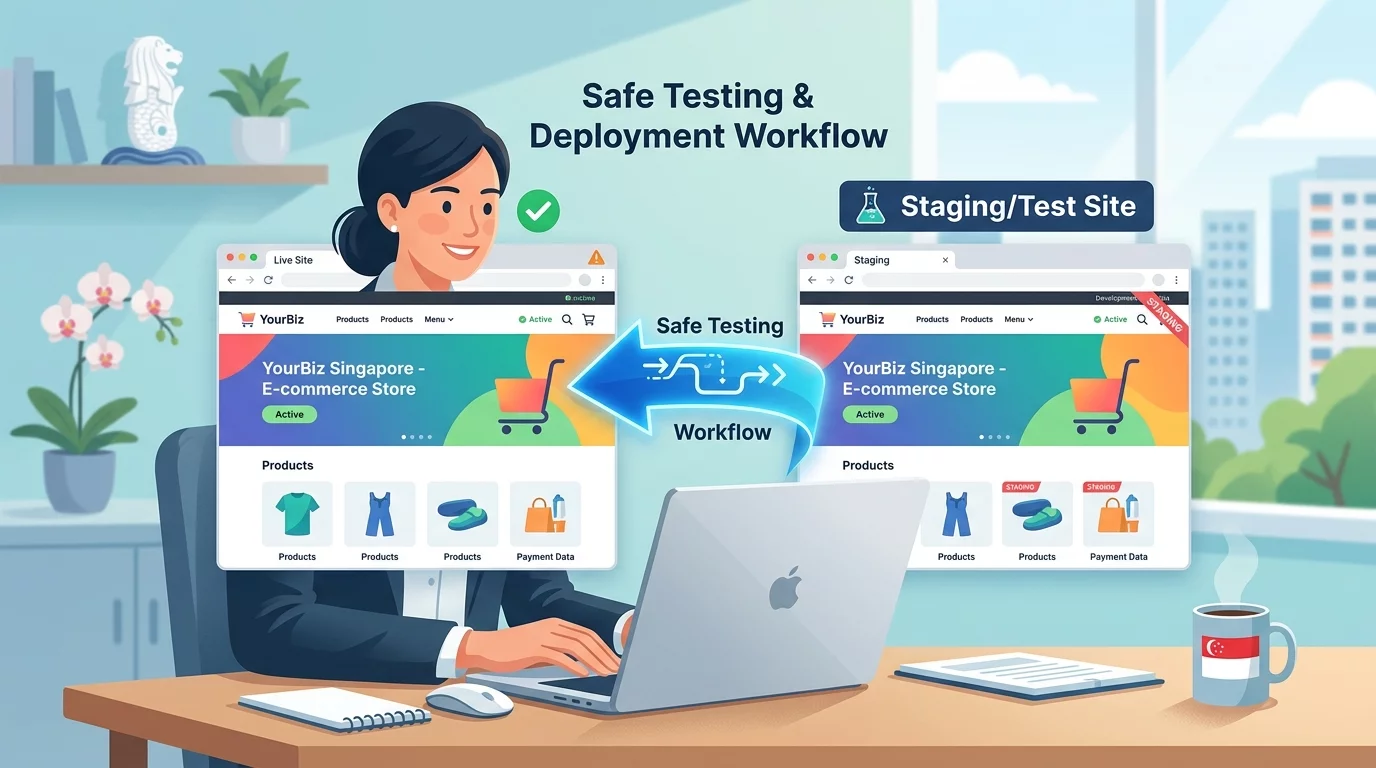
A staging environment is a separate version of your website that exists on the same server or a separate server, configured to look and behave exactly like your production (live) website. It is not visible to the public — only you and your web developer can access it. When you make changes to your staging site, you are working on a copy, not the real thing. This means you can update plugins, change themes, modify content, add new features, or even attempt major redesigns, all without touching your live website until you are absolutely certain everything works.
The key difference between staging and live is simple: staging is your laboratory, live is your storefront. You experiment behind the scenes, and only when you are satisfied with the results do you push those changes to the actual website that customers visit.
Why Staging Environments Matter for Singapore Business Owners
Singapore has one of the most digitally connected populations in the world. Your customers expect your website to be available 24 hours a day, seven days a week. When they encounter a broken website, they do not wait around — they move on to your competitor. A 2024 survey by Slack among Singapore workers found that nearly 60% would abandon a purchase if they encountered a website error, and many would not return.
Beyond lost sales, there is also the matter of trust. If your website displays errors, broken pages, or incorrect information, visitors will question whether your business is legitimate and professional. This is especially damaging for small and medium enterprises in Singapore that rely heavily on their online presence to build credibility.
Using a staging environment helps you avoid these problems by giving you a safe space to test everything before it goes live. Whether you are updating your WordPress version, adding a new payment gateway, redesigning your product pages, or even just publishing a new blog post, staging testing ensures that what you publish works correctly.
Types of Staging Environments You Should Know About
Before we get into the how-to, let us quickly cover the three main types of staging environments you might encounter:
1. Local Staging: This is when you download a copy of your website onto your own computer using tools like Local by Flywheel, XAMPP, or MAMP. It runs entirely on your local machine. This is useful for quick experiments but requires some technical skill to set up and maintain.
2. Subdomain Staging: Your web host creates a separate subdomain such as staging.yourdomain.com or test.yourdomain.com where a copy of your site lives. This is usually the easiest option for Singapore business owners because it is hosted on the same server as your live site and does not require any special software.
3. Dedicated Staging Server: A completely separate server environment used solely for testing. This is typically used by larger businesses or e-commerce operations where the site is complex and needs rigorous testing across multiple environments.
For most Singapore small and medium business owners, subdomain staging provided by your web host is the most practical and recommended option.
Step-by-Step: Setting Up a Staging Environment
The exact steps vary depending on your web host and the platform you use. Below are general step-by-step instructions that apply to the most common scenarios in Singapore.
Step 1: Check If Your Web Host Offers Built-In Staging
Many Singapore web hosts such as Exabytes, Vodien, and CloudRadar offer one-click staging features, especially if you use cPanel or a managed WordPress service. Log into your web hosting account and look for sections labeled "Staging," "Staging Environment," "Test Site," or "Clone Site."
If your host offers this feature, the setup is usually as simple as clicking a button that says "Create Staging Environment" or "Clone Website." The host will automatically create a copy of your site on a subdomain for you to use. This is by far the easiest path and is what I recommend for non-technical business owners.
Step 2: Access Your Staging Site
Once your staging site is created, your web host will provide you with a URL to access it. This is typically something like staging.yourdomain.com or yourdomain.com/staging. You will also receive login credentials — often the same ones you use for your live WordPress admin panel.
Write down the staging URL and keep it somewhere safe. You will need it every time you want to test something.
Step 3: Make Test Changes on Your Staging Site
Now comes the actual work. Log into your staging site and start making the changes you want to test. Here are common scenarios you might want to test:
- Plugin Updates: Update your plugins one by one on the staging site and check if anything breaks. If you see errors, you know to wait for a fix or find an alternative plugin before updating on the live site.
- Theme Changes: If you want to try a new WordPress theme, install and activate it on staging first. Check that all your pages look correct, your menu works, and your images display properly.
- Content Updates: Draft new blog posts, update product descriptions, or redesign your homepage on staging. Preview how everything looks before publishing to your live site.
- New Features: If you are adding a new booking system, live chat widget, or payment gateway, test it thoroughly on staging to ensure it integrates correctly with your existing setup.
Step 4: Review and Fix Any Issues
After making changes on your staging site, spend time reviewing the results. Check all major pages, test interactive features like forms and buttons, view the site on both desktop and mobile devices, and verify that there are no error messages in your browser console.
If something breaks or does not look right, fix it on the staging site first. This is exactly what staging is for — you can troubleshoot and iterate without any consequences.
Step 5: Push Changes to Your Live Site
Once you are satisfied with your changes on the staging site and everything works correctly, you can push those changes to your live website. The exact method depends on your setup:
- One-click sync: Many hosting providers offer a "Push to Live" or "Deploy" button that copies your staging changes to the production site automatically.
- Manual migration: In some cases, you may need to manually copy files and databases from staging to live using a tool like phpMyAdmin or an FTP client. This requires more technical knowledge.
- WordPress staging plugins: If you are using a plugin like WP Stagecoach, Duplicator, or WP Staging, the plugin will have its own process for deploying changes to the live site.
Regardless of the method, always create a full backup of your live site before pushing any changes. This gives you a safety net in case something goes wrong during the deployment process.
What to Do If Your Web Host Does Not Offer Staging
Not all web hosts in Singapore offer built-in staging features, especially the cheaper shared hosting plans. In that case, you have a few options:
Use a WordPress Staging Plugin: Plugins like WP Staging, Duplicator, and All-in-One WP Migration allow you to create a staging copy of your site within your existing hosting account. You install the plugin on your live WordPress site, and it creates a copy in a subfolder or subdomain for you. Many of these plugins have free versions that are sufficient for basic testing needs.
Upgrade Your Hosting Plan: Consider switching to a hosting plan that includes staging functionality. Many managed WordPress hosts in Singapore now include staging as a standard feature. While this may cost slightly more, the convenience and peace of mind are often worth it.
Use a Separate Staging Service: There are third-party services likeWP Stagecoach and Hardal that can create and host a staging version of your WordPress site externally. You connect your live site to the service, and it maintains a separate staging copy that you can access through their platform.
Common Mistakes to Avoid When Using Staging Environments
Even with a staging environment available, Singapore business owners sometimes make errors that lead to problems on their live site. Here are the most common ones and how to avoid them:
Mistake 1: Not Testing on Mobile: Many business owners only check their staging site on desktop computers. However, a significant portion of your visitors in Singapore will be browsing from mobile phones. Always test your changes on both desktop and mobile views before pushing to live.
Mistake 2: Skipping Testing After Minor Changes: Even a small change like updating a plugin or changing a font can have unexpected effects on your site layout. Always review your staging site thoroughly after any change, no matter how minor it seems.
Mistake 3: Forgetting to Sync Staging with Live: If you have been using your staging site for a while but have also been making live updates, the staging copy can become outdated. Before doing major testing, sync your staging site with the latest version of your live site to ensure you are working with current content.
Mistake 4: Not Checking Error Logs: When something goes wrong on your staging site, check your error logs. Most web hosts provide access to error logs through cPanel or their control panel. These logs often contain specific details about what went wrong and can help you diagnose issues quickly.
Mistake 5: Using Staging for Actual Content: Remember that your staging site is a testing environment, not a working copy of your site. If you add new blog posts or update product pages on staging and then push to live without proper review, you might inadvertently publish incomplete or incorrect content. Treat staging purely as a testing ground.
When Staging Environments Are Most Useful
There are specific situations where having a staging environment becomes especially valuable for Singapore business owners:
Before Major Updates: If you are planning to update your WordPress core, switch themes, or install major new plugins, always test on staging first. The last thing you want is to wake up to a completely broken website because of a compatibility issue.
During Website Redesigns: If you are refreshing your website design or layout, work on staging first. Make all the visual changes, test them thoroughly, get stakeholder approval on the staging version, and only then deploy to live.
Before Promotional Campaigns: If you are running a major sales campaign, National Day promotion, or Black Friday sale, test all landing pages and promotional content on staging. Check that your checkout process works, that discount codes apply correctly, and that your server can handle the expected traffic spike.
After Security Incidents: If your website has been hacked or you have detected malicious code, do not try to fix it on the live site. Restore from a clean backup to your staging environment, clean it up thoroughly, test that everything is secure, and then push the clean version back to live.
Understanding the Connection Between Staging and SEO
A common concern among Singapore business owners is whether changes made on a staging site can affect their Google search rankings. The good news is that staging environments are typically blocked from search engines using robots.txt rules and noindex meta tags, meaning Google will not crawl or index your staging site. This is intentional — you do not want Google to index your test content and potentially show it to users.
However, when you push changes from staging to live, you need to be careful. If you accidentally change URLs, break internal links, or remove important pages during your staging tests, those changes will carry over to your live site and could affect your SEO performance. Always audit your staging changes before deploying to ensure you are not inadvertently breaking SEO elements like meta titles, descriptions, heading structures, and internal links.
Final Checklist Before Publishing from Staging to Live
Before you push any changes from your staging site to your live website, run through this checklist:
- All pages load correctly on both desktop and mobile
- All forms submit and send emails correctly
- Images and media files load properly
- No error messages appear in your browser developer console
- Links to internal pages all work correctly
- Any new features or functionalities behave as expected
- Your site speed has not noticeably degraded
- You have created a full backup of your live site
- You have reviewed all changes on staging one final time
Only when everything on this checklist passes should you proceed with pushing changes to your live site.
Staging environments are one of the most powerful tools available to website owners, yet many Singapore small business owners either do not know about them or do not use them properly. By understanding and implementing staging environments in your workflow, you can dramatically reduce the risk of website downtime, broken pages, and embarrassing mistakes that damage your brand. Every time you are about to make a change to your website — whether it is updating a plugin, adding new content, or redesigning a page — go to your staging environment first, test thoroughly, and only then push to live. Your customers, your reputation, and your peace of mind will thank you for it.
If you still need help, feel free to contact us at https://webcare.sg/contact for a free website health check.
Related WebCare Solutions
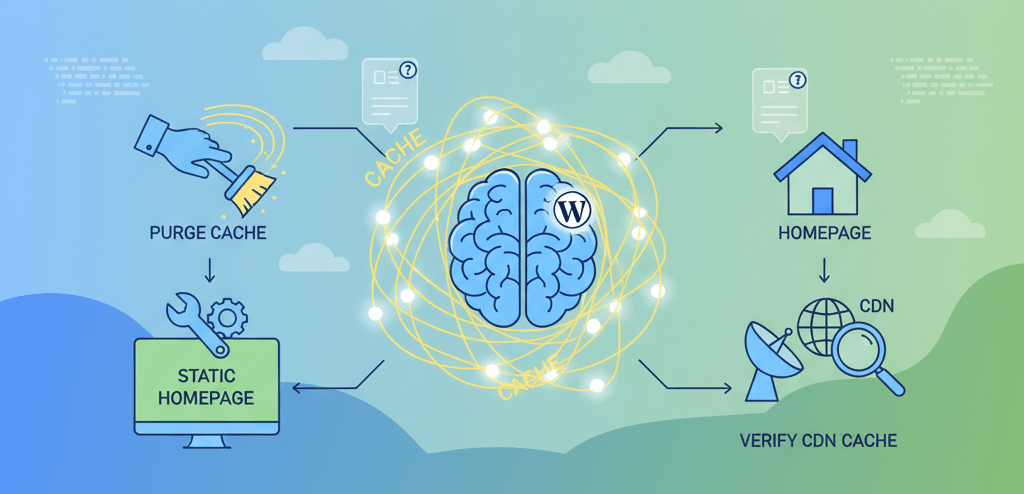
WordPress New Posts Not Appearing on Homepage: The Cache Conundrum
A practical guide to troubleshooting and fixing why new posts are not appearing on your WordPress homepage by purging cache, checking static page settings, and verifying CDN layers.
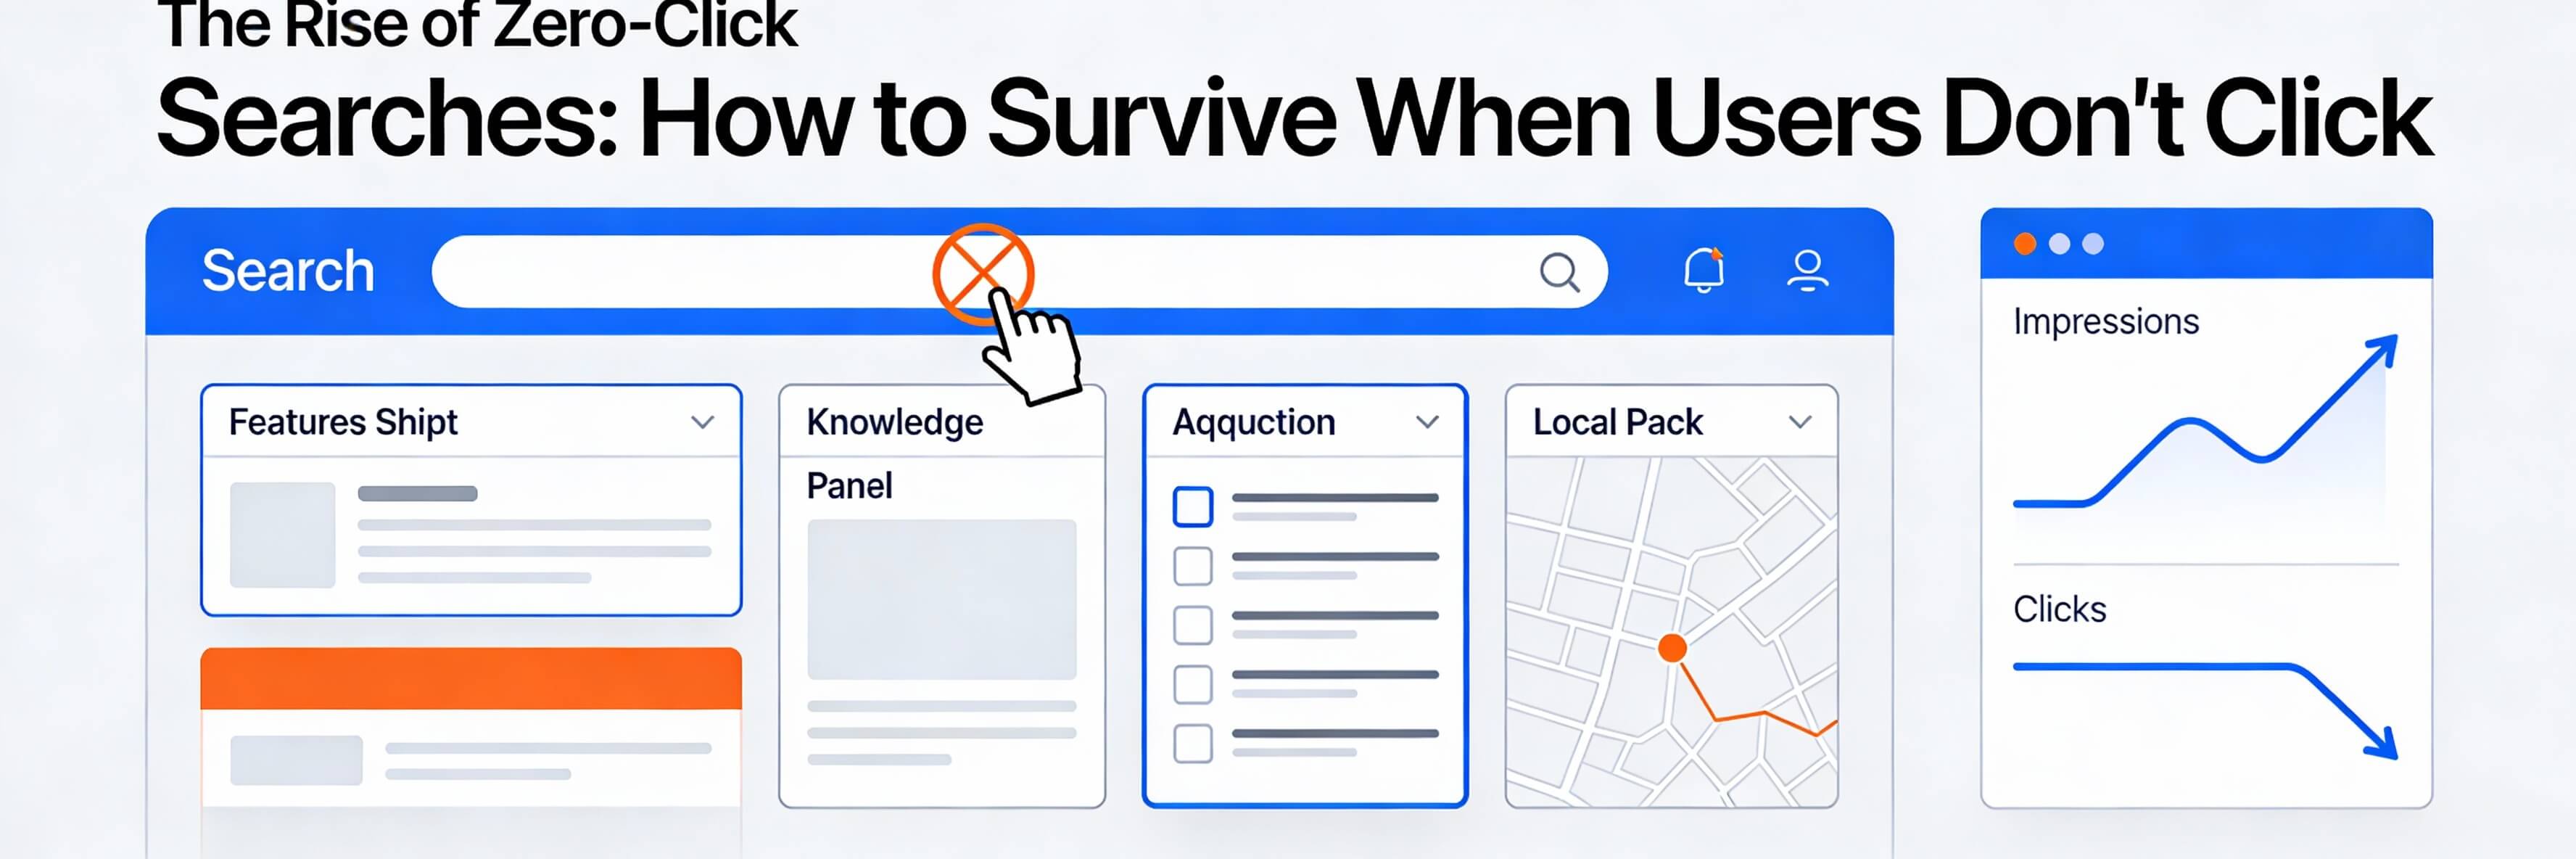
The Rise of Zero-Click Searches: How to Survive When Users Don''t Click
Discover how to maintain brand visibility and value even when searchers find answers directly on Google without clicking through to your website.
Why Is My Contact Form Not Sending Emails?
A step-by-step guide for Singapore business owners to diagnose and fix a contact form that isn't sending emails.
Ready to get started?
Focus on your business while we fix your website. Contact WebCareSG today for fast, reliable solutions!
Whatsapp us on