How to Take Professional-Looking Product Photos on a Budget
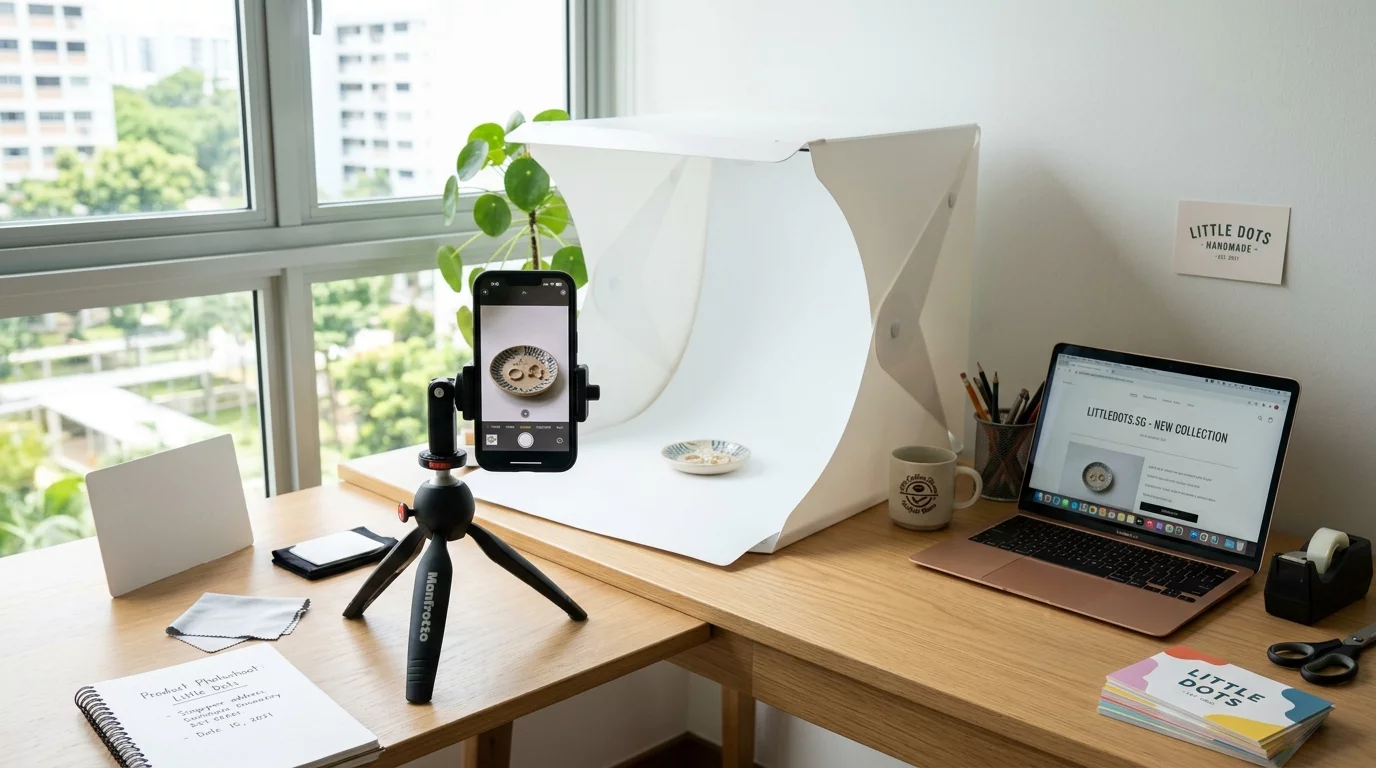
As a Singapore small business owner, you know that high-quality product photos can make or break your online sales. But hiring a professional photographer costs money you may not have in your budget. The good news? You can take stunning product photos yourself using just your smartphone and a few affordable tools. In this guide, we'll walk you through everything you need to know to photograph your products like a pro, without breaking the bank.
Good product photography is critical for your e-commerce success. When customers cannot see or touch your products online, photos become your primary sales tool. Blurry, poorly lit, or messy-looking product images make potential customers click away and buy from competitors instead. Studies show that high-quality product images can increase conversion rates by up to 40%. For Singapore businesses selling on platforms like Shopee, Lazada, or your own Shopify store, professional-looking photos give you a competitive edge and build customer trust.
Step 1: Set Up Your Photography Space
Before you start taking photos, you need to create the right environment. You do not need an expensive studio. A simple corner of your office or home can work perfectly.
Choose a room with natural light from a window. North-facing windows in Singapore work best because they give soft, even lighting without harsh shadows. Avoid direct sunlight as it creates bright spots and dark shadows that ruin product photos.
Clear a table or desk near your window. Remove everything from the surface so you have a clean, uncluttered background. A white or light-coloured surface works best because it reflects light softly and keeps your product well-lit.
If your table surface is dark or patterned, you can create a simple background using a white poster board or a large sheet of white paper. Position the poster board behind and under your product to create a seamless white background that looks professional.
Step 2: Control Your Lighting
Natural light from your window is your best friend when doing product photography on a budget. Position your product setup so that the window light comes from the left or right side of your product, not directly from the front or behind.
Side lighting highlights the texture and shape of your product better than front lighting. It creates dimension and makes your product look more three-dimensional and appealing.
If your window produces harsh shadows on one side, use a white reflector to bounce light into the shadow areas. You can make a simple reflector using a large piece of white cardboard or foam board. Place it on the opposite side of your product from the window to fill in shadows.
The best time for product photography in Singapore is late afternoon when the sun is not too harsh. Avoid taking photos during midday when sunlight is strongest and creates the most contrast. Overcast days are actually perfect for product photography because the clouds act as a giant softbox, creating even, diffused light across your products.
Step 3: Use Your Smartphone Like a Pro
Modern smartphones have incredibly powerful cameras that rival professional equipment for product photography. Here is how to maximize your smartphone's capabilities.
First, clean your lens. smudges and fingerprints on your phone lens create hazy, unclear photos. Wipe your lens with a soft, clean microfiber cloth before every photography session.
Next, set your phone to use the highest resolution and quality settings. Go into your camera app settings and make sure you are shooting in the highest megapixel mode available. This gives you sharper, more detailed images that look professional when customers zoom in to examine your products.
Use the 2x or 3x zoom button to get closer to your product without moving physically closer. This zoom uses a dedicated telephoto lens on most modern phones and produces sharper images than the main lens cropped digitally.
Stabilize your phone by resting it on a stack of books or a small tripod. Even slight movements create blurry photos. Many affordable smartphone tripods are available online from Shopee or Lazada for under SGD 20.
Step 4: Style Your Products Attractively
The way you arrange and present your products dramatically affects how professional your photos look. Here are some styling tips for different product types.
For clothing and apparel, neatly fold or hang items so they show their shape clearly. Use steam or a light iron to remove wrinkles before photographing. Add small accessories like scarves or jewellery to create visual interest and help customers imagine how the items can be styled.
For food and beverages, fresh-looking, well-arranged items photograph best. Cook or prepare items just before your photoshoot so they look their best. Use small amounts of fresh herbs, garnishes, or decorative elements to add colour and appeal. Wipe any spills or drips from containers before photographing.
For cosmetics and skincare products, clean all bottles and tubes thoroughly. Remove any product residue from the outside of containers. Group related items together in an aesthetically pleasing arrangement. Include ingredients lists or packaging details if they are selling points.
For handcrafted or artisanal products, show the craftsmanship and details that make your items special. Use a macro or close-up mode to capture texture and quality. Include any brand labels or distinctive markings that identify your products.
Step 5: Take Multiple Shots from Different Angles
Never settle for just one photo of each product. Take multiple shots from different angles and perspectives to give customers a complete view of what they are buying.
Start with a straight-on shot showing your product head-on. This is typically the main product image customers see first when browsing. Make sure the product fills most of the frame and is perfectly centered.
Next, take a 45-degree angle shot that shows both the front and side of your product. This perspective feels natural and helps customers understand the three-dimensional shape of your product.
Then, shoot from directly above your product looking down. This overhead angle works especially well for flat items like food, accessories, or multiple products arranged together in a flat lay.
Finally, take close-up detail shots of any important features. Show texture, labels, ingredients, or any unique aspects of your product. These detail shots help customers see quality and build confidence in their purchase decision.
Step 6: Edit Your Photos Professionally
Even great photos usually need some basic editing to look their best. Do not worry if you have no editing experience. Free smartphone apps make professional editing accessible to everyone.
Start by adjusting brightness and contrast. Photos often look better with slightly higher brightness and slightly lower contrast than the default camera settings produce. Small adjustments prevent your products from looking washed out or too dark.
Next, enhance the colours slightly. If your product colours look muted or dull, a small boost in saturation can help. Be careful not to over-saturate colours until they look unnatural and fake.
Use the crop tool to improve your composition. Remove any distracting elements at the edges of your photos. Make sure your product is well-centered and fills enough of the frame. The rule of thirds is a useful guideline: position your product slightly off-center rather than perfectly in the middle.
Finally, sharpen your images slightly. Most smartphone cameras soften images a small amount to reduce digital noise. A slight sharpening filter brings back crisp detail and makes your products look sharper and more professional.
Step 7: Save and Organize Your Photos
Once you have taken and edited your product photos, proper organization ensures you can find and use them easily for all your sales channels.
Create a dedicated folder on your phone or computer for each product. Name folders clearly with product names and shoot dates. Include both the original unedited photos and your edited final versions.
For Shopee and Lazada listings, save your main product image as a square or near-square format. These platforms display product thumbnails in a grid, so square images show best without cropping. Save detail shots and lifestyle images in both square and landscape formats for flexibility.
For your own online store or social media, export your edited photos in high quality. JPEG files at 90% quality or higher work well for web use. Keep original files backed up in cloud storage or an external hard drive in case you need to edit them again in the future.
Step 8: Upload and Optimise for Each Platform
Different selling platforms have different image requirements. Understanding these requirements helps your products look their best everywhere you sell.
For Shopee, product images should be at least 800 by 800 pixels. The main image must show the product clearly with a white or light background. Text and watermarks on images can hurt your visibility in search results, so keep your main images clean and uncluttered.
For Lazada, images should be at least 800 pixels on the longest side. Like Shopee, white backgrounds work best for the main product image. Make sure your images load quickly by keeping file sizes reasonable without sacrificing too much quality.
For your own Shopify store, you have more flexibility with image sizes and styles. Product images on at least 2048 pixels on the longest side display best on high-resolution screens. Include multiple images for each product so customers can zoom in and examine details closely.
Step 9: Create Lifestyle and Context Photos
Beyond clean product-on-white photos, lifestyle images showing your products in use or context help customers imagine owning them. These photos build emotional connection and differentiate your brand from competitors.
Create simple lifestyle shots using your smartphone. Show your products being used in realistic Singapore settings like your home, office, or neighbourhood. A coffee mug on a desk, skincare products on a bathroom shelf, or accessories styled on a person all create aspirational context.
Keep backgrounds clean and uncluttered in lifestyle photos. Busy or messy backgrounds distract from your product and reduce the professional impact of your images. Use the portrait mode on your phone to blur backgrounds naturally and make your product the clear focus.
Show scale clearly so customers understand the actual size of your products. Include common objects like coins, books, or everyday items that help communicate dimensions. A handbag that looks large in a photo but arrives tiny disappoints customers and leads to returns.
If you sell products that come in multiple colours or variants, photograph each variant. Customers searching for specific colours need to see what they are actually buying. Group variant photos consistently so customers can easily find and compare options.
Step 10: Maintain Consistent Quality Over Time
Once you have mastered product photography, maintaining consistent image quality across all your listings builds your brand reputation and keeps customers trusting your products.
Create a photography setup you can recreate quickly. Keep your backdrop, reflector, and positioning markers stored together so you can set up and start shooting within minutes whenever you need new photos. Consistency in lighting, angles, and styling across all your products makes your entire catalog look more professional and cohesive.
Schedule regular photo sessions rather than scrambling to photograph new products at the last minute. Even 30 minutes every week keeping your product photos up to date prevents the stress of rushing through photography when you launch new items.
Keep learning and improving by studying product photos from brands you admire. Notice what makes their images look professional and try applying similar techniques to your own photography. Small improvements over time add up to a significant upgrade in your overall product presentation.
Document your best practices in a simple guide you can reference. Write down your camera settings, lighting setup, editing steps, and any tricks that work well for your specific products. This reference helps you maintain quality even when you have not photographed products in a while.
If you still need help, feel free to contact us at https://webcare.sg/contact for a free website health check.
Related WebCare Solutions

The Importance of Regular Website Maintenance
Discover why regular website maintenance is crucial for security, performance, and reliability. Learn through our WordPress case study on updates, backups, and consistent checks.

Paid Ads Not Converting? Your Tracking Might Be Broken
If your paid ads are underperforming, the culprit might not be your creative, but broken tracking. Discover the tell-tale signs of misconfigured pixels and learn how unreliable data can lead to low ROAS and wasted ad spend.

How to Properly Install Facebook Pixel on WordPress
Learn the best ways to install the Facebook (Meta) Pixel on your WordPress site in 2024, covering both manual code insertion and popular plugin methods. Crucially, discover how to avoid common pitfalls like duplicate pixel fires for accurate data.
Ready to get started?
Focus on your business while we fix your website. Contact WebCareSG today for fast, reliable solutions!
Whatsapp us on